Archive
Faster Videos in Firefox
1.Type about:config in the adress bar
2.Use the filter box to find the setting browser.sessionstore.interval
3.Edit the default value 10000 (10 seconds in million seconds)
to 180000 which is 3 min
How does the tweak work?
Firefox takes snapshots of ur browser every 10 sec to restore iffirefox crashes but slows flash too so this is a slight compromise forfast videos.
Enjoy Mates!!!
Upload what ever you want
Low hard disk space but high speed internet with unlimited transfer, then its not a problem
The table below shows the top 25 online backup companies in the world. Our ranking is based on a number of factors.
Here are some of the major criteria that we strictly followed to come up with these top 25 companies:
* Security
* Software Features
* Software Ease of Use
* Speed
* Reliability
* Uptime
* Quality and Accessibility of Technical Support
* Cost per MB per month
The Top 25 Online Backup Companies for August 2007 are:
1. http://www.mediamax.com
2. http://www.mozy.com
3. http://www.box.net
4. http://www.carbonite.com
5. www.ibackup.com
6. http://www.novastor.com
7. http://www.datadepositbox.com
8. http://www.evault.com
9. http://www.intronis.com
10. http://www.file123.com
11. http://www.filesanywhere.com
12. http://www.remote-backup.com
13. http://www.backup-technology.co.uk
14. http://www.omnidrive.com
15. http://www.amerivault.com
16. http://www.livevault.com
17. http://www.BeInSync.com
18. http://www.backupsolutions.com
19. http://www.quantumrbs.ca
20. http://www.drivehq.com
21. http://www.dataprotection.com
22. http://www.titanize.com
23. http://www.vaultlogix.com
24. http://www.sosonlinebackup.com
25. http://www.bitleap.com
HOW TO BLOCK UNWANTED MAILS IN GMAIL YAHOO HOTMAIL..
Do you want to block those annoying offers and newsletters that reachyour inbox? Well here is a way to block all those unwanted and annoyingemails that you do not want to see or read! With this trick you canblock individual email address or the whole domain from which you donot want the emails to come from. Here are the step-by-stepinstructions to do this.
For Gmail
1. Login to your account
2. At the top-right corner, click on Settings
3. Under Settings, click on Filters
4. You’ll now see an option “Create a new filter“, click on it
5. Now in the From field enter the email address from which you do not want to receive the emails
For ex. you may enter micheal@gmail .com in the From field to block allincoming emails from this address. However if you want to block thewhole domain then use the following syntax: *****@abc.com. Now all theincoming emails from the domain xyz.com will be blocked.
6. Click on Next Step, select the action you’d like to take on theblocked emails. You may select the option Delete it so that the blockedemail is moved to trash. To unblock the email, all you need to do isjust delete the filter that you’ve created.
For Yahoo
1. Login to your account
2. At the top-right corner, click on Options
3. A drop down menu appears, now click on More options
4. In the left panel select the option Filters and click on create or edit filters
5. Now click on Add
6. In the next screen, give a name to your filter and in the From header field enter the email address that you want to block.
Fox ex. micheal@gmail.com or if you want to block an entire domain thenjust enter @abc.com. Dont enter *@abc.com. Select the option Move themessage to: Trash and click on Save Changes.
For Hotmail
1. Login to your account
2. At the top-right corner, click on Options
3. A drop down menu appears, now click on More options
4. Click on Safe and blocked senders link under Junk e-mail
5. Now click on Blocked senders
6. Type in the email address that you want to block under blocked e-mail address or domain field.
For ex. Enter john@yahoo.com to block the individual email address or just enter abc.com to block the entire domain.
That’s it. You no longer receive those annoying emails in your inbox.Keep your inbox clean and tidy . I hope this post helps. pass yourcomments!
Chat without Yahoo Messenger or Gtalk
summary_noimg = 300;summary_img = 200;img_thumb_height = 110;img_thumb_width = 150; //<![CDATA[function removeHtmlTag(strx,chop){ if(strx.indexOf("<")!=-1) { var s = strx.split("<"); for(var i=0;i“)!=-1){ s[i] = s[i].substring(s[i].indexOf(“>”)+1,s[i].length); } } strx = s.join(“”); } chop = (chop =1) { imgtag = ‘‘; summ = summary_img; } var summary = imgtag + ‘
‘; div.innerHTML = summary;}//]]>


- Easy to use, Simple installation that will have you up and running in minutes.
- 128-Bit Security Socket Layer(SSL) support. support for server level certificate creation.
- Instantly runs a complete chat server on your PCs – does not need to install any Web Server.
- Supports full private messaging and One to One private chat.
- Support of images, smileys, avatar icons.
- Full chat and access logs are available within the chat server.
- Have a built-in IP Filter, supports banning/unbanning IP address, securely.
- Multiple styles available for the user to customize rooms.
- Unlimited rooms and users, no any annual, per-user, or maintenance fees.
- No spyware, adware or other unwanted extra programs.
Iexpress file joiner, exe binder, exe packer to hack remote computer
Today i am posting a .exe binder which is default in windows …which is helpful to to bind with virus to send to the victim..
Iexpress File joiner exe binder:
Just follow guidelines below to use Iexpress file joiner exe binder windows utility.
1. Go to Start -> Run (Can also press shortcut key Win+R). In dialog box, enter- iexpress and hit on OK to bring up File joiner.
2. Now, you will get something like:
3. Hit on Next twice and then on Package title pane, enter the name of exe package you want to create and hit on Next.
4. Again hit on Next to get Confirmation prompt, you can choose to show a message to victim before first exe installation. File joiner will show this message. This is particularly useful if you want to install on victim computer a server trojan that is detected by antiviruses. You can select “Prompt user with” and in text box enter something like:

“Windows will install necessary files. Please disable your Antivirus before further installation proceeds.”
which will make victim to disable his antivirus and thus our server can do its work efficiently. This is all social engineering part which you can make more effective by your own logic.
Hit on Next twice and in Packaged files pane, enter exe files you want to bind using “Add”. Hit on Next to go to next file joiner pane.
5. Now, this is important. In Install Program to Launch pane of file joiner, select the files from drop down box as shown:
– Install program : Select the file you want victim to see in the installation.
– Post install program : Select the server keylogger or trojan file which you want to install on victim computer without his knowledge.
Hit on Next.
6. On next windows pane, select “Hidden” and hit on Next. In next Finished message box of exe binder, you can choose to show up a message on installation completion.
7. Hit on Next and enter the path and file name where the file binder should save the binded file. Choose name same as the file name you have told to victim. Also, check on “Hide file extracting animation from user”.
8. Hit on Next and adjust restart setting as you wish depending on working of your server trojan. Hit on Next and in Save Self Extraction Directive, you can choose any option. Hit on Next twice to create binded file. Now, file joiner binder will create binded file for you.
9. Now, you have your server trojan binded file ready on your computer. Simply send this file to victim via email.
10. Once the victim double clicks on this installation package ie binded file, first he is greeted with a dialog box like this:
This is the result of step 4 of Confirmation prompt. Once he disables his Antivirus, our server trojan can easily install itself on victim computer and thus you can hack his computer or various online accounts easily.
Note: To make server function correctly on victim computer, you need to make it “Run as admininstator” on victim computer.
So friends, I hope you are now well-known with use of iexpress file joiner, exe binder windows utility used to bind server keylogger files with normal exe files. Iexpress is best file joiner, exe binder and exe packer. If you have any problem in using this iexpress utility as file joiner, please mention it in comments.
Enjoy iexpress utility as file joiner, exe binder software…
25 Useful Ubuntu Shortcuts To Make your Life Easier
Earlier, i have posted about useful windows shortcuts. This time, i have compiled a list of 25 useful Ubuntu shortcuts (not those commonly known Ctrl+C type shortcuts) that make your life easier. These shortcuts will help you do routine tasks more quickly and easily.
Recently, Ubuntu 8.10 Intrepid Ibex was released and i must say this version of Ubuntu has improved a lot over earlier versions. If you haven’t tried Ubuntu ever, then this is the time you should give ubuntu a try.
Here goes the shortcuts list.
Window Management
Note: Some shortcuts might require Compiz enabled on your Ubuntu system.

1. Win+E – Shows all workspaces in a nifty way and lets you switch between workspaces easily.
2. Alt+Ctrl+Left/Right Arrow – Move to Workspace on Left/Right
3. Alt+Ctrl+Shift+Left/Right Arrow – Move current window to another workspace
4. Alt + Shift+ Up Arrow – This initiates a cool looking window switcher interface with which you can switch between windows using Arrow keys while holding Alt + Shift

5. Alt+F9/F10 – Minimize/ Maximize current window
6. Alt+F5 – UnMaximizes Current Window
7. Alt+F7 – This shortcut activates the move window option that lets you move current window using arrow keys. You can even move window to other workspace, try moving it to extreme right.
8. Alt+F8 – Resize current window with arrow keys
9. Ctrl + Alt + D – Show Desktop/ Restore open windows if show desktop used earlier
10. Alt+Shift+Tab – Switch Windows in Reverse Direction as done using Alt+Tab
Nautilus
11. Shift+Ctrl+N – Create New Folder, Very useful shortcut
12. Alt + Enter – Show properties of a selected file/folder without requiring to right click on it and select Properties.
13. Ctrl + 1/2 – Change folder view to icon/list.
14. Ctrl + W – close current Nautilus Window
15. Ctrl + Shift + W – close all open Nautilus Windows
16. Ctrl+T – Open a new tab in Nautilus
17. Alt + Up/Down Arrow – Move to Parent Folder/ Selected folder
18. Alt + Left/Right Arrow – Move Back/forward in Nautilus
19. Alt + Home – Move directly to your Home Folder
20. F9 – Toggle display of Nautilus Sidepane
21. Ctrl + H – Toggle Display of hidden files and folders
Miscellaneous
22. Ctrl + Alt + L – Quick shortcut to Lock Screen if you need to be away from your desktop for few moments and don’t want others to see your desktop.
23. Alt + F1 – Open Applications Menu
24. Alt + F2 – Open the Run Application dialog Box
25. Win + Mousewheel – Zoom in / Zoom out Desktop. This one’s pretty useful if you are having a wireless keyboard/mouse.
I hope these shortcuts will make your life easier doing routine repetitive tasks and make you more productive using your Ubuntu System.
If you know of some other useful Ubuntu shortcuts, feel free to share them in comments below.
Enable Task manager
 Task manager can be disabled in system due to some kind of virus activity.If user press alt+ctrl+del to launch windows task manager it gives an error saying “Task Manager is being disabled by your administrator”.
Here is the solution:
To Enable the Disabled Task Manager on your system
**Go to Start–>Run or press window key+r to open run prompt
** Then enter gpedit.msc in the run prompt and click OK
** In the Group Policy settings window
Select User Configuration –>Administrative Templates –> Select System –> Select Ctrl+Alt+Delete options –> Select Remove Task Manager
** Double-click the Remove Task Manager option.
** Set the property of this item as disabled.
** Exit the registry and restart to see the effec
Rename at a time to many files
You have a lots of photos in some folder on your computer, all have numbers-names, and you want to name them like Home1.jpg, Home2.jpg, … Don’t need to do that one by one. You can do that automatically with this little trick.
Open that folder and chose View – Thumbnails
i)Left click on any picture and CTRL + A. That way you will select all files in that folder.
ii)Right click on first pic and chose “Rename” from drop-down menu.
Renaming files tip
Windows XP will highlight name of that file and you will be able to name it. After filling the name, click somewhere outside, in white space. You’re done. If you named firs file “Anything” all selected files will get names “Anything1”, “Anything2”, “Anything3”, and so on.
Generate date & time in Notepad
Open Notepad write .LOG(in capital letters)
in that & save as diary.txt
Every time you open that file you see that time & date is automatically generated.
Fun with Notepad
1)The flight number of the plane that had hit WTC on 9/11 was Q33N ….
In Notepad, type the flight number i.e. Q33N
Increase the Font Size to 72, Change the Font to Wingdings.
You will be amazed by the findings !!!
2)Open Notepad.
Type the words as follows:
Bush hid the facts.
Now save the file (give it any name you like), close the notepad.
open it again. ou will se Square characters instead of the words you had written.
It Works Only with XP.
It works with certain names. It worked with:
bush
saddam
tony blair
Make ur name in orkut to invisible characters
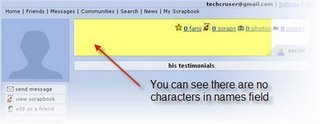
Follow these simple steps to make your names field invisible in Orkut.
>>Step 1: Copy the Blank Text Below. ( in between inverted commas)
” ᠌ “
>>Step 2:Go to your Orkut profiles page and press Ctrl+V on the first and last names field.
Thats all you have to do for making the names field invisible
Hope you enjoyed playing with this trick.
